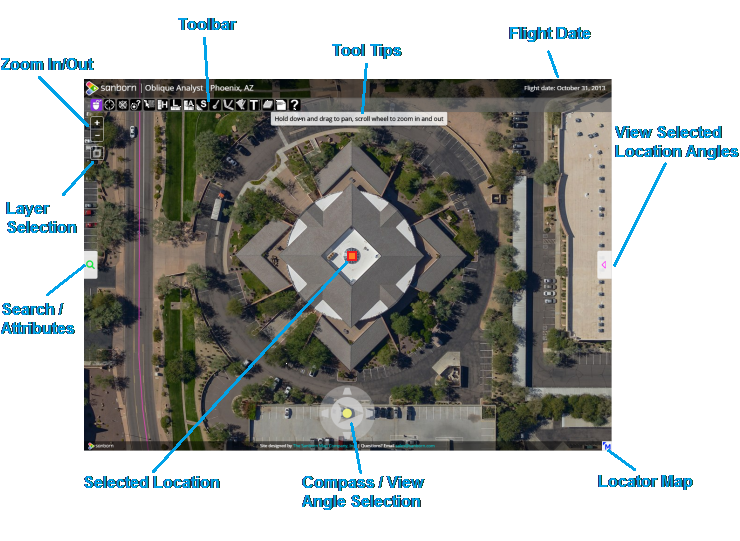
Overview
This web application, which we'll simply call the Viewer from here on, let's you view and navigate across aerial photographs. It automatically selects the best photo for your current area of interest and let's you switch between different perspectives such as looking straight down or at an angle to the north, east, south or west.
Overview video on the functionality of the Viewer:
The Viewer has the following major components which are described in detail further on in this document (note: your Viewer will have a different title).
Details
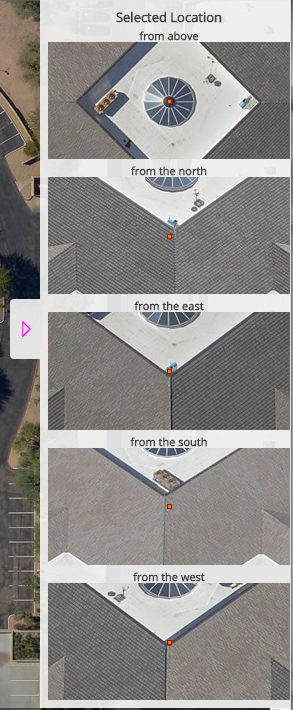
Selecting a location will automatically open the alternate views. Clicking or touching the triangular button on the right of the Viewer will open alternate views of the selected location (if you have placed one). Click the triangle again to close.
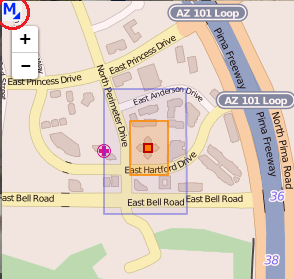
Clicking or touching the 'M' button near the lower-right of the Viewer will open a locator map. Click the 'M' again to close.

Starting the Viewer with URL parameters
You can start the viewer at a specified location by using one of the following URL parameters.
- Coordinates: http://<Viewer site>/<Viewer name>/?ll=lat,long
- Local Coordinates: http://<Viewer site>/<Viewer name>/?xy=x,y
(local coordinates in the projection units used in the EO (meters or feet)) - Address: http://<Viewer site>/<Viewer name>/?addr=address
- Feature ID: http://<Viewer site>/<Viewer name>/?id=featureID
Navigating Across the Aerial Photos
Zooming in and out

The Viewer supports zooming from a high level overview to close up detail. You can zoom in and out in three ways:
- Click the + to zoom in or the - to zoom out.
- With the Pan and Zoom Tool selected, double-click on the photo to zoom in.
- Using a mouse, roll the scroll wheel away from you to zoom in and toward you to zoom out.
Depending on the size of your browser window, you may see the edges of the aerial photo when your zoomed out the farthest. This is normal and does not prohibit you from moving between photos.
Panning
With Pan and Zoom Tool selected, click/touch and drag the photo in any direction. If another photo provides a better view of the center from the same perspective the Viewer will automatically switch to that photo. This means that you can pan continuously over the ground even though you are viewing only one photo at a time. This switch of photos will appear as a subtle shift in perspective or scale and may not even be readily apparent to you.
The Compass
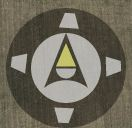
The Compass at the bottom of the Viewer always points to true north. You may notice it turning slightly to maintain its true orientation as you pan across a photo. It also maintains its circular shape relative to the ground. This means that it will be nearly circular in photos looking straight down but will appear increasingly flattened and elliptical as your view moves away from vertical.
The buttons in the outer ring indicate which oblique viewing angles are available. The half circle button in the middle indicates the nadir or top-down view. The triangle button in the center indicates a top-down, north-up navigation view which is also used to view WMS layers.
Changing perspective at the view center
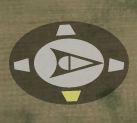
A circular button may be present at the center of the Compass and trapezoidal buttons may appear around its edges. These represent the different perspectives that are currently available for the center of the view. The button that's highlighted in yellow represents the current perspective. Hovering over one of these buttons will give you a quick peek of the photo center from that perspective. Click on the button to switch to that perspective. The Compass will rotate to true north for the new view.
Working at a Selected Location
You can place a marker at a particular location on the ground using the Search Tool so that the location is readily apparent as you switch perspectives.

Be sure that the slide-out mode is on Search.
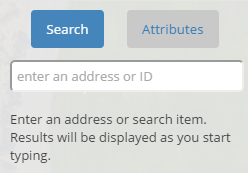
Placing the location at an address
To place the marker at an address, enter the address in the text box within the Search slide-out panel of the Viewer then hit Enter or select from the list that appears. If the address is valid the Viewer will zoom to that address and place the marker. If it's not valid, an error message will appear briefly under the text box. Note that you can only enter addresses within the project area of the aerial photos. In most cases you will not need to specify the city or town name.
Placing the location on a landmark
To place the marker on a landmark, enter the name of the landmark in the text box withing the Search slide-out panel of the Viewer then hit Enter or select from the list that appears. If the landmark is valid the Viewer will zoom to that landmark and place the marker. If it's not valid, an error message will appear briefly under the text box. Note that you can only enter landmarks within the project area of the aerial photos.
Placing the location on a geographic feature
Your viewer may be configured so that you can place the marker on a specific type of geographic feature such as a parcel. If so, you can enter the ID of a feature in the address box. If the feature ID is valid (it must match exactly) the Viewer will zoom to the center of that feature and place the marker. If it's not valid, an error message will appear briefly under the text box.
Also note that your viewer may be configured to draw the geographic features as an overlay on the photos.
Placing the location manually

You can place the marker at any location by selecting the Set Location Tool and clicking on the photo. The selected Tool will immediately switch to Pan and Zoom after the marker has been placed.
Switching views of the location

Thumbnails of all available views of the selected location are provided in the slide-out panel along the right edge of the view. Click on one of these to go to that view centered on the location. The name of that view will be highlighted in yellow until you navigate away from the selected location.
Removing the location

To remove from the map the location you placed click on the Remove the current location button.
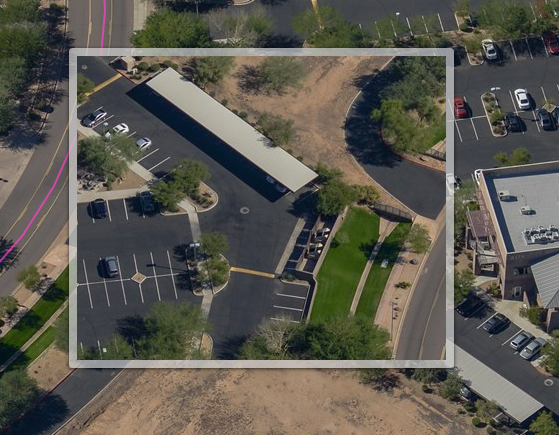
Understanding the Locator Map
The locator map shows the footprint of your current view as an orange quadrilateral. The footprint of the entire aerial photo you are viewing is shown in blue. These footprints will appear rectangular for aerial photos which look straight down and trapezoidal for side views (see below). The extent of all of the photos in this set will appear as a lightly shaded red area with a thick border. If you have placed a location marker on the main view it will also appear on the locator map.
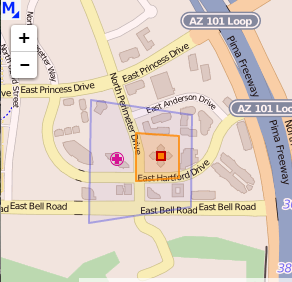

The locator map is automatically recentered each time you pan the main view. You can zoom the locator map either by using the scroll wheel on your mouse or by clicking the plus/minus buttons at the left side of the locator map. You can pan by clicking/touching and dragging the map. Note that the entire world is available on the locator map and it is possible to pan far away from your current view. If you get lost simply pan the main view slightly and the automatic recentering will bring the footprint back into view.
Drawing on the Viewer
You can draw shapes and text on the aerial photo. These only exist in your current Viewer session and are not saved. Drawings are placed relative to the ground. This means they will maintain their approximate geographic locations as you change perspectives. Note that text will always draw horizontally and will not rotate with the perspective.
Drawing Points

To draw points click on the Draw Point Tool. Click or tap on the photo to place a small marker.
Drawing Lines
To draw lines click on the Draw Line Tool. Click or touch the photo repeatedly to create a multi-segment line. Double-click or double-touch to stop drawing.
Drawing Polygons
To draw polygons click on the Draw Polygon Tool. Click or touch the photo repeatedly to create a polygon. Double-click or double-touch to stop drawing.
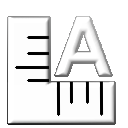
Drawing Text

To draw text click on the Draw Text Tool. Click or tap on the photo at the location of the lower-left corner of the new text. A text input box will appear at that location. Type your text into the box then hit Enter to place the text on the photo.
Erasing your Drawings
If you would like to remove all of your drawings from the view, click on the Remove Drawings Tool.
Making Measurements
Coordinates

You can get the geographic coordinates of any point on the aerial photo by clicking on the Coordinate Display Tool, and hovering the mouse or touching the location.
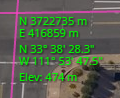
The coordinates are only rough approximations. Due to normal distortions in aerial photos and variations in ground elevation the coordinates may be off by several meters from their true values. Also note that the Viewer is not aware of buildings that appear in the photos. Coordinates taken at the apparent top of a building in a side view are actually for ground level behind that building.
Measuring Heights

To measure heights of objects on the aerial photos, begin by clicking on the Measure Height Tool. Click or touch the photo and drag to draw a line showing the height. The line will be constrained to moving up and down vertically relative to objects on the photo. Once you have clicked/touched the first point you can move the cursor or you finger away from the line for visibility without interrupting the measurement. Click again or lift your finger to end the measurement.
Note that the lower point, of the line, and not the first point you click, is always considered to be at ground level. This means it's only possible to measure up from the ground, not down into the ground.
Height measurement is disabled when your perspective is looking straight down.
Measuring Lengths

To measure lengths click on the Measure Length Tool. Click or touch the photo repeatedly to create a multi-segment line. The length of that line in feet and meters will appear above the cursor. Double-click or double-touch to end the measurement.
Measuring Areas
To measure areas click on the Measure Area Tool. Click or touch the photo repeatedly to create a polygon. The area of that polygon in square feet, square meters, and acres will appear in the center of the polygon. Double-click or double-touch to end the measurement.
Measuring Length and Area at Height
The length and area measurements described above are performed at ground level. To make these measurements above the ground, such as on the top of a building, hold the Ctrl-key down when clicking the first point. This will temporarily place you in height measurement mode. Drag the height measurement line to define the height offset then click or touch the points of your measurement shape. The length or area will then be computed at the height you defined above ground level.
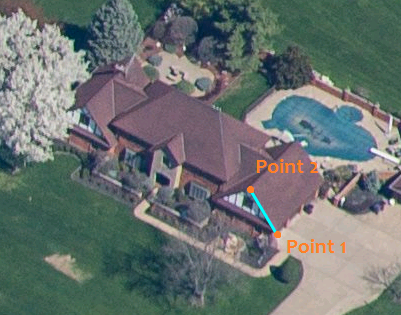
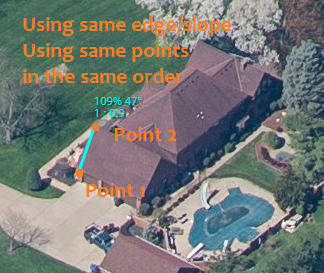
Measuring Slope
Slope measurement is somewhat more complex than the other measurement functions. For the Viewer to understand where your sloped feature is in 3D space you must identify it from two different perspectives. Follow these steps:
- Pan, zoom and change the perspective with the Compass to get the optimal view of the sloped edge.
- Select the Measure Slope Tool.
- Click two points along the sloped edge, preferably at its visible extremities.
- Change the perspective with the Compass.
- Click the same two sloped edge points in the same order.
- As you move to place the second point you will see the slope value expressed three common ways:
- As a percentage (run * 100 / rise)
- As an angle in degrees (arctan2(rise, run))
- As a ratio (1 : run / rise)
You may start or end the slope measurement in a nadir view if necessary.
Copying Measurement Text
While measuring you can use Ctrl-C to copy the current measurement values into the clipboard. You can then paste that measurement text into any document or program.
Measurements as Drawings
All measurements, except for coordinates, persist on the Viewer as drawings. They can be removed with the Erase Drawing button. Because of the change in perspective, height measurements and area/length measurements at height offsets are not perserved when moving between photos.
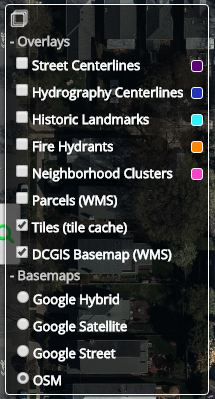
Working with Layers
Toggling Layers

Shapefiles and WMS feeds can be added as overlay layers. To toggle a layer on and off, click on the Layers button, then click on the layer you wish to toggle on or off. After toggling layers, you can click the Layers button again to close the key.
Shapefile layers will have a color key depicting which layer is a particular color. Currently, the colors cannot be changed within the Viewer.
There are also an assortment of base layers that can be toggled by clicking on any one of them.
The layer categories can be expanded or collapsed by clicking the category title, ie "Overlays" or "Basemaps".
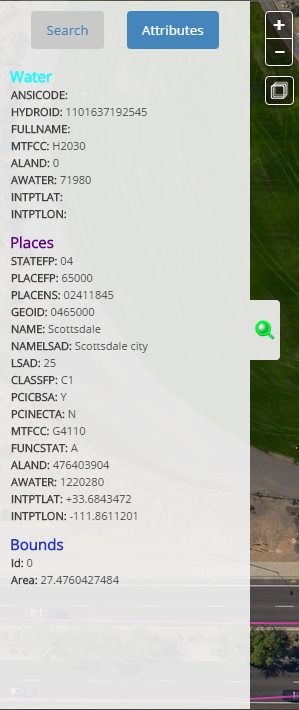
Viewing Attributes
The attributes of the shapefile(s) can be viewed by selecting the View Attributes Tool and clicking on the shape(s) in the main window. The attributes (if any are available) will display in the Search slide-out on the left side of the Viewer. This slide-out can be closed by clicking the Search button on the right of the slide-out.
Sharing Your View
Creating a PDF for saving or printing
You can create an Adobe PDF document of your current view for printing or sharing by clicking on the Create PDF Tool. A new browser window or tab will pop up and the PDF document will appear there. It may take some time to generate and download the PDF so please be patient. Your selected location marker and any drawing visible in the view will also appear in this document. The printing of layers has been disabled at this time.
Copy Location URL

Click this button to copy a URL containing your current location to the clipboard. It can then be pasted anywhere.
Larger Viewing

Click this button to toggle full screen mode.
Getting Help
Specific instructions for the use of each Mouse/Touch tool are shown at the top-center of the map.
Still have questions?
Email us: sales@sanborn.com